
Tags
Dynamics CRM Facebook Lead Form Integration, Facebook API, Facebook API using Postman, Facebook Lead Form using Facebook API, Integrate Facebook with Dynamics CRM, Integration Facebook Lead Form with Dynamics CRM using Facebook API
Pre-requisites
To get started with Facebook Lead Form, we will need:
- A Facebook App
- A Facebook Page
Create Facebook App
Step 1: Start the app creation process
Navigate to the My Apps and click Create App (refer Fig. 1).

(Fig. 1)
Step 2: Choose Use Case
Select Other and click on Next (refer Fig. 2).

(Fig. 2)
Step 3: Choose an app type
Select Business and click on Next (refer Fig. 3).
Your app type determines which products and APIs are available to your app.

(Fig. 3)
Step 4: Set your app name and email
Enter the name of your app and an email address (refer Fig. 4).
The email address can be different from the email address associated with your Facebook account, just make sure it’s valid and that you monitor it, since all important notifications will be sent there.

(Fig. 4)
Once you have completed the app creation flow, your app will be loaded in the App Dashboard (refer Fig. 5).
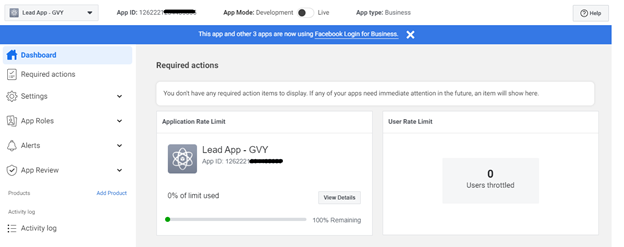
(Fig. 5)
Create Facebook Page
Step 1: Login to school’s Facebook account.
Step 2: Navigate to Pages.
Step 3: Click on “Create new Page”.
Step 4: Enter Page Name and Category and click on Create Page (refer Fig. 6).

(Fig. 6)
Step 5: Page created successfully. Now, complete the remaining steps to finish setting up the page.
Create a Facebook Lead Form using Meta Business Suite
- Login into Meta Business Suite.
- Click All Tools from the menu.
- Click Instant Forms.
- To create a new form, click Create Form.
- Select New Form or Duplicate an Existing Form, then click Next.
- In the Form Name box, specify the name of the Form.
- In the Form Type box, select the type of Instant Form.
- To add an introduction section to your Instant Form, click Intro. You can include a background image and greeting (refer Fig 7).

(Fig. 7)
- To enter the questions, we want to answer on the Instant Form, click Questions.
- To add your own custom questions, click + Add Question. In my case I have added two custom questions (refer Fig. 8).
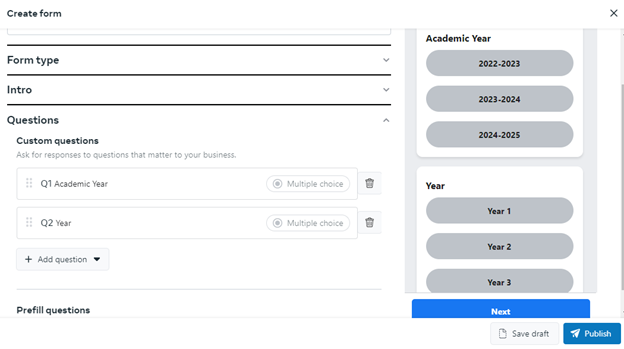
(Fig. 8)
- To include prefill questions with auto-populated answers from the person’s Facebook account:
Choose the information you’d like to have prefilled in your form. To add a category, click + Add Category.
It should be noted that users of your form have the option to alter the prefilled responses.
- To add your privacy policy, click Privacy. Then enter the URL for your privacy policy page and add your link text.
- To add a message for leads to see after they submit your form, click Completion.
- To preview each section of your form, click the arrows at the top of the Form Preview.
- When you’re done, click Publish to complete your form.
How to generate a User or Page Access Token
- Navigate to this URL
https://developers.facebook.com/tools/explorer
- Select the App that was created earlier
- Select the User or Page
- To generate the User Access Token
- Select User Token
- Add the following required permissions
- pages_show_list
- ads_management
- ads_read
- pages_messaging
- leads_retrieval
- pages_read_engagement
- pages_read_user_content
- pages_manage_ads
- pages_manage_engagement
- Click on Generate Access Token
- Copy and save the User Access Token for further steps.
- To generate the Page Access Token
- Select Facebook Page (that was created earlier)
- Add the following required permissions
- pages_show_list
- ads_management
- ads_read
- pages_messaging
- leads_retrieval
- pages_read_engagement
- pages_read_user_content
- pages_manage_ads
- pages_manage_engagement
- Click on Generate Access Token
- Copy and save the Page Access Token for further steps.
Using Postman and the Facebook API, retrieve data from the Facebook Lead Form.
Fetch Facebook Lead Data by Form ID
To fetch the Facebook Lead Form data by Facebook Form ID, browse the URL https://graph.facebook.com/<FORMID>/leads?access_token=<USER_ACCESS_TOKEN> and replace the FORMID with the Facebook Form ID and USER_ACCESS_TOKEN with the user access token as generated in the above steps.
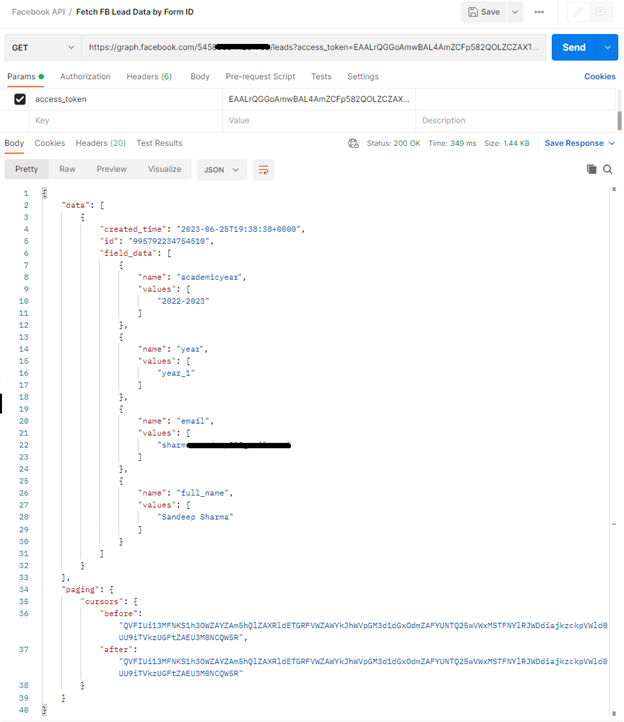
(Fig. 9)
Fetch Facebook Lead Data by Page ID
To fetch the Facebook Lead Form data by Facebook Page ID, browse the URL https://graph.facebook.com/<PAGEID>/leads?access_token=<PAGE_ACCESS_TOKEN> and replace the PAGED with the Facebook Page ID and PAGE_ACCESS_TOKEN with the page access token as generated in the above steps.

(Fig. 10)
After retrieving the data from the Facebook Lead Form using the Facebook API, we can use either Power Automate Flow or CRM plugins to generate the necessary entity records in Dynamics CRM in accordance with the needs or requirements of the business.
I hope this blog is helpful.
